


17 Easy Home Aesthetic DIY Projects You Can Finish in One Day
You don’t need a full renovation, professional tools, or an entire weekend to make your home feel elevated. Some of the most impactful aesthetic upgrades are the ones you can start and finish in a single day—projects that rely on smart choices, intentional styling, and a clear understanding of what actually transforms a space.
This guide focuses on practical, realistic DIY ideas designed for real life. Whether you’re a renter working within limits, a beginner avoiding complicated builds, or simply short on time, these 17 projects prioritize high visual impact, low effort, and achievable results. Every idea here fits into a single day, a reasonable budget, and a lifestyle that doesn’t revolve around constant renovations.
If you want your home to feel more intentional, calm, and aesthetically put together—one day is more than enough to start.
3.1 Peel-and-Stick Accent Wall Panels
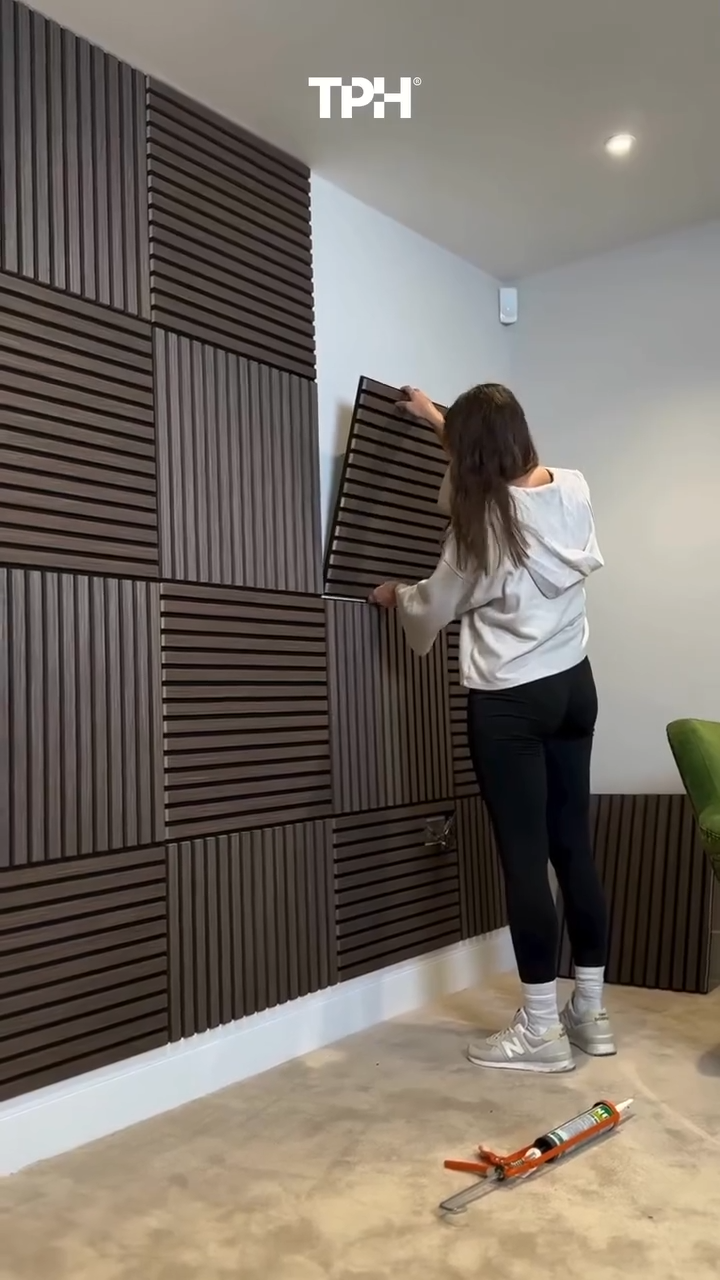
The Panel Hub®
Peel-and-stick wall panels are one of the fastest ways to create a high-end architectural look in a single day—no power tools, no permanent damage, and no professional help required. This project is especially popular for renters and modern interiors inspired by Japandi, Scandinavian, and minimalist aesthetics.
Why This DIY Works So Well
- Instant visual impact with texture and depth
- Rental-friendly (removable adhesive options available)
- Can be completed in 2–4 hours for one feature wall
- Makes small spaces feel intentionally designed
Best Places to Use Them
- Behind a sofa or bed
- TV or media wall
- Entryway feature wall
- Home office backdrop
How to Do It (One-Day Friendly)
- Prep the wall
- Clean and dry the surface thoroughly
- Remove dust, grease, or residue
- Plan your layout
- Dry-fit panels on the floor first
- Alternate directions if using slatted or geometric designs
- Start from the bottom
- Peel backing gradually, not all at once
- Use a level every 1–2 panels
- Trim as needed
- Use a utility knife for outlets or edges
- Press and secure
- Apply firm pressure along edges and seams
Pro Styling Tips ✨
- Stick to warm wood tones or matte neutrals for a timeless look
- Avoid covering every wall — one accent wall is enough
- Pair with soft lighting (floor lamps or sconces) to enhance texture
Estimated Cost: $$
Skill Level: Beginner
Time Needed: Half day
3.2 DIY Framed Fabric or Wallpaper Art
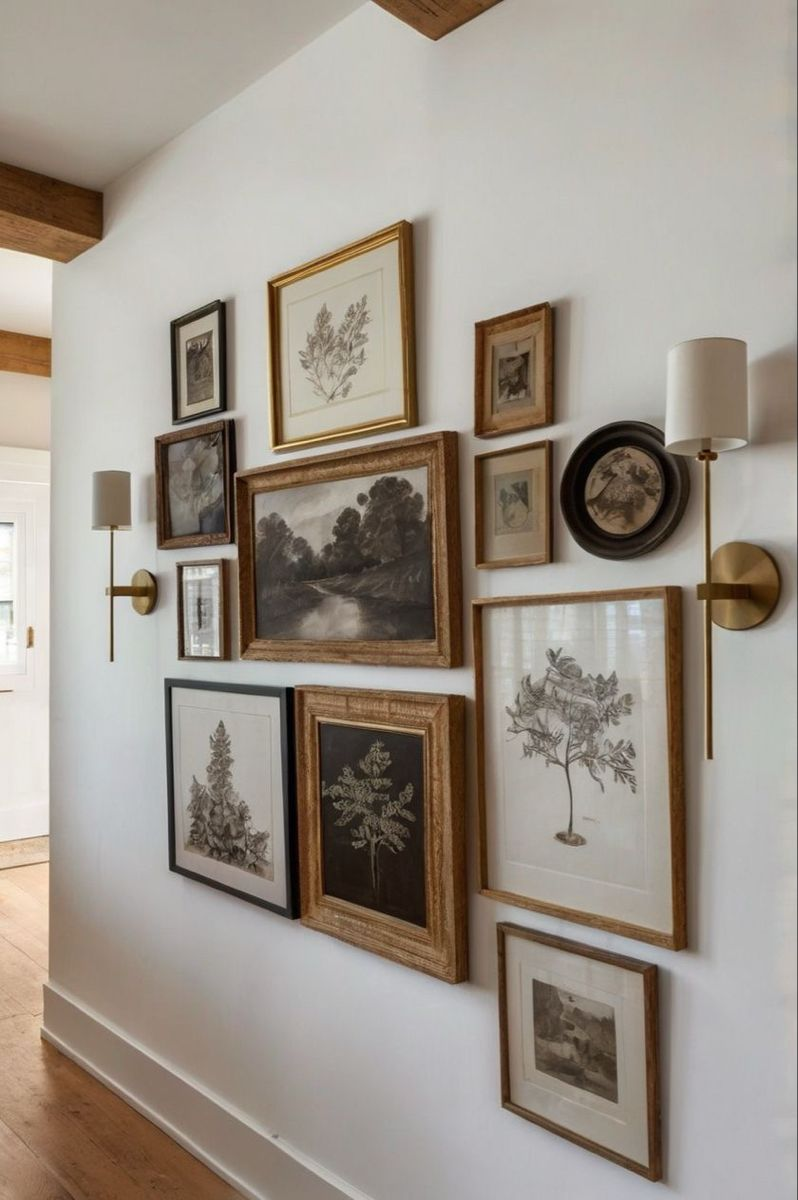
Sumeria Reagan
Framed fabric or wallpaper art is a designer-favorite trick for creating a curated, gallery-style wall without investing in expensive artwork. This project works beautifully for vintage, cottagecore, transitional, and modern-classic interiors and can be completed start-to-finish in a single afternoon.
Why This DIY Is So Effective
- Creates a custom, collected look
- Easy to swap out seasonally or as tastes change
- Works with thrifted frames for budget-friendly results
- Zero artistic skill required
What to Use Inside the Frames
- Wallpaper samples (textured, botanical, toile)
- Linen or cotton fabric scraps
- Vintage book pages or botanical prints
- Neutral-patterned wrapping paper
How to Create It (One-Day Project)
- Collect frames
- Mix sizes for visual interest
- Stick to a cohesive tone (wood, gold, black)
- Cut inserts precisely
- Use a craft knife and ruler
- Keep borders consistent for a polished look
- Mount your material
- Use acid-free tape or backing boards
- Plan the layout
- Arrange on the floor first
- Maintain even spacing between frames
- Hang securely
- Use removable hooks for renter-friendly installs
Styling Tips for a High-End Result ✨
- Keep artwork in a limited color palette
- Balance busy patterns with solid or minimal pieces
- Anchor the wall with one larger frame, then build around it
Estimated Cost: $–$$
Skill Level: Beginner
Time Needed: 2–3 hours
3.3 Picture Ledge or Floating Shelf Styling
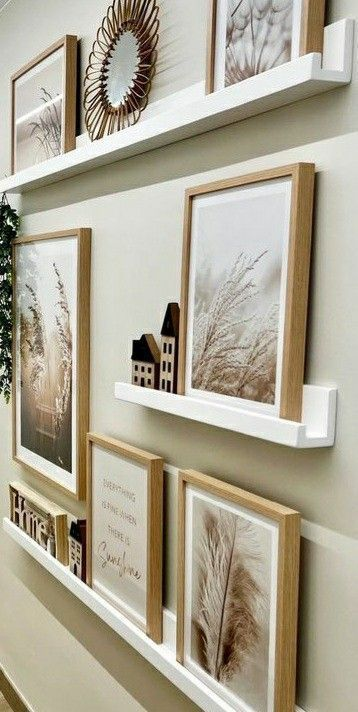
Jullys Place ♥ Stylish Home Decor & Apartment Living
Picture ledges and floating shelves are a low-effort, high-style DIY that instantly elevates blank walls while keeping everything flexible and renter-friendly. The focus here isn’t heavy installation—it’s intentional styling that looks curated rather than cluttered.
Why This Project Works
- Creates depth without committing to permanent layouts
- Easy to refresh anytime—no rehanging required
- Perfect for small spaces and narrow walls
- Completes a room in under 2 hours
What to Display on a Picture Ledge
- Framed prints or photography (layered, not flat)
- Small mirrors or sculptural objects
- Minimal ceramics or wood decor
- Trailing plants or greenery
How to Style It (One-Day Friendly)
- Install the ledge
- Use wall anchors or studs for stability
- Keep shelves level and evenly spaced
- Start with the largest frames
- Place them toward the back
- Layer smaller pieces in front
- Vary heights and orientations
- Add 1–2 accent objects
- Avoid overcrowding
- Step back and adjust
- Balance negative space intentionally
Pro Styling Tips
- Stick to odd numbers of objects per shelf
- Repeat colors or materials for cohesion
- Leave breathing room — empty space is part of the design
Estimated Cost: $$
Skill Level: Beginner
Time Needed: 1–2 hours
4.1 One-Day Furniture Makeover (Paint or Stain)
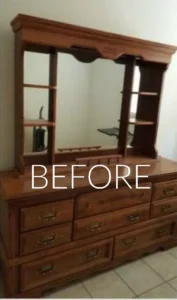
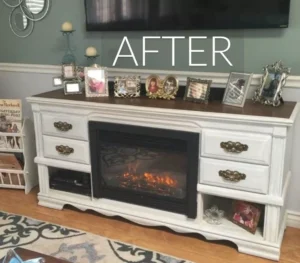
A furniture makeover is one of the most satisfying one-day DIY projects because it delivers a dramatic before-and-after transformation with relatively simple tools. The image perfectly demonstrates a dated wooden piece transformed into a modern, intentional statement—a trend that performs exceptionally well on Pinterest, TikTok, and Instagram Reels.
Why This DIY Is So Popular
- Turns outdated or thrifted furniture into a custom piece
- Much cheaper than buying new furniture
- High visual payoff for relatively low effort
- Works for dressers, sideboards, nightstands, and TV consoles
Best Furniture Pieces for One-Day Makeovers
- Small dressers or consoles
- Nightstands
- Coffee tables
- Sideboards or buffet cabinets
How to Do It in One Day
- Prep the surface
- Clean thoroughly with degreaser
- Light sanding to remove shine (no stripping needed)
- Prime if necessary
- Essential for dark wood or glossy finishes
- Paint or stain
- Use chalk paint, mineral paint, or fast-dry latex
- Apply thin, even coats
- Let dry & seal
- Use a water-based sealer for quick curing
- Reattach hardware
- Or upgrade it for an even bigger transformation
Pro Tips for a Professional Finish
- Stick to neutral tones (warm white, greige, soft black)
- Use a foam roller for smooth surfaces
- Replace hardware for an instant high-end upgrade
- Let the piece cure overnight before heavy use
Estimated Cost: $$
Skill Level: Beginner–Intermediate
Time Needed: 4–6 hours (active time)
4.2 Contact Paper Countertop or Shelf Refresh
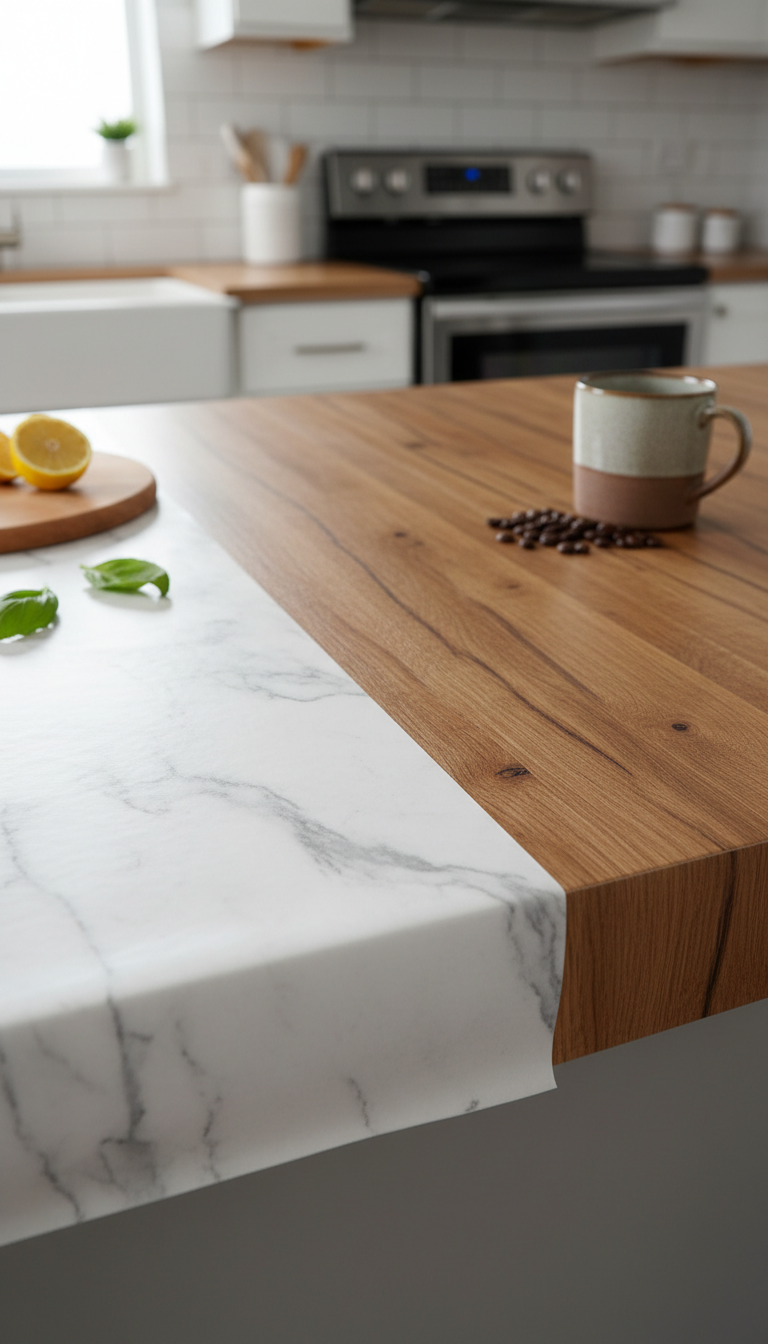
Contact paper is one of the most viral aesthetic DIY upgrades right now, especially for renters who want a dramatic surface refresh without permanent renovation. The image perfectly reflects the trend of mixing warm wood with marble-look finishes—a look that dominates Pinterest and TikTok kitchen makeovers.
Why This DIY Is So Popular
- Completely renter-safe and removable
- Creates the illusion of real stone or wood
- Extremely budget-friendly compared to renovations
- Can be completed in 1–3 hours
Best Surfaces for This Project
- Kitchen countertops
- Open shelves
- Bathroom vanities
- Desktops or console tops
How to Apply It Smoothly (One Day)
- Clean the surface thoroughly
- Remove grease, dust, and residue
- Measure and cut generously
- Leave extra inches on all sides
- Peel and stick gradually
- Work in small sections
- Use a squeegee or credit card to remove bubbles
- Trim edges cleanly
- Use a sharp utility knife
- Seal edges (optional)
- Clear caulk for moisture-prone areas
Pro Tips for a Realistic Finish
- Choose matte or lightly textured contact paper
- Align marble veining consistently
- Avoid stretching the paper while applying
- Let it rest 24 hours before heavy use
Estimated Cost: $
Skill Level: Beginner
Time Needed: 1–2 hours
4.3 Hardware Swap for Instant Upgrade
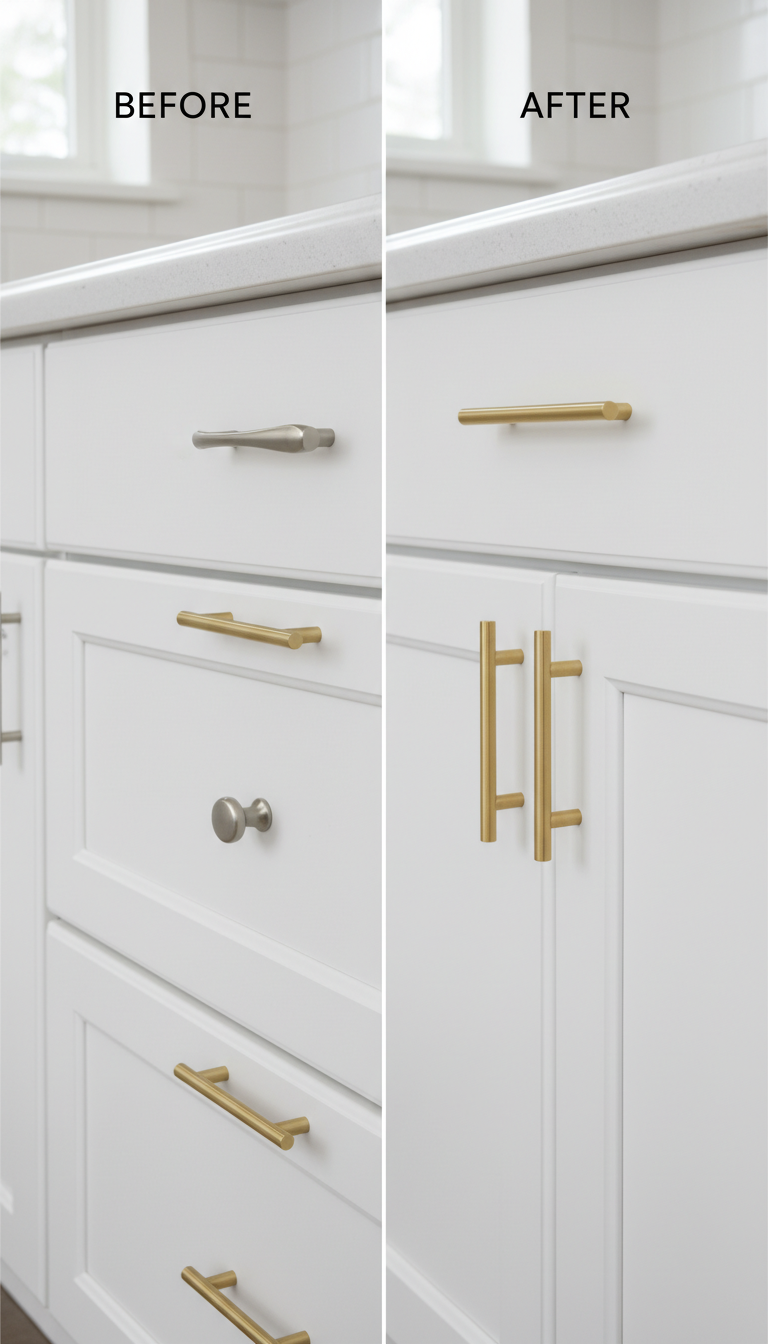
Swapping out cabinet or furniture hardware is one of the simplest one-day DIYs with the highest return on effort. As shown in the image, replacing dated knobs with sleek, modern pulls instantly modernizes the entire space—no renovation required.
Why This DIY Delivers Fast Results
- Takes less than 1 hour for most rooms
- No special skills or tools needed
- Makes cabinets and furniture feel brand new
- Works in kitchens, bathrooms, dressers, and built-ins
Best Hardware Styles Trending Now
- Brushed brass or champagne gold
- Matte black bar pulls
- Minimal cylindrical handles
- Warm antique bronze for vintage spaces
How to Do It in One Day
- Measure existing hole spacing
- Standard sizes save time and drilling
- Choose a consistent finish
- Match lighting or faucet tones if possible
- Remove old hardware
- Keep screws in case of reuse
- Install new pieces
- Hand-tighten first, then secure evenly
- Check alignment
- Step back and visually confirm balance
Pro Tips for a Polished Look ✨
- Use longer pulls to make cabinets feel taller
- Keep knobs for drawers, pulls for doors (or vice versa)
- Replace hinges too if they’re visible and dated
- Clean cabinet fronts before installing for a crisp finish
Estimated Cost: $–$$
Skill Level: Beginner
Time Needed: 30–60 minutes
5.1 DIY Decorative Candles (Twisted, Layered, Sculptural)
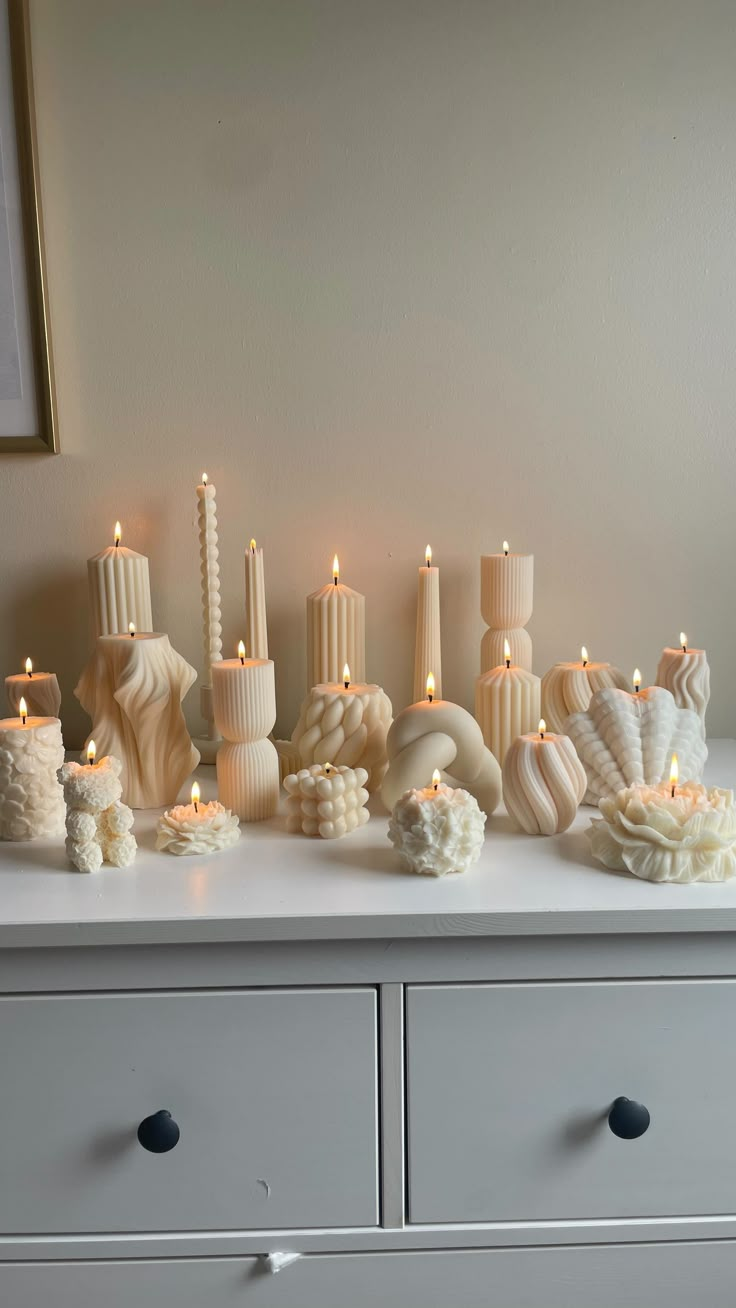
Northern Rose Co
Decorative candles are one of the most viral aesthetic DIY projects across Pinterest, TikTok, and Instagram—and for good reason. They add warmth, texture, and sculptural interest while being inexpensive and surprisingly easy to make in a single day.
Why This DIY Is Trending Everywhere
- Instantly elevates shelves, consoles, and coffee tables
- Works across minimalist, modern, and organic interiors
- Customizable shapes, colors, and sizes
- Doubles as decor even when unlit
Popular Candle Styles Right Now
- Twisted taper candles
- Bubble or cube candles
- Abstract body or sculptural forms
- Ribbed or fluted pillar candles
How to Make Them in One Day
- Choose your mold
- Silicone molds work best for clean shapes
- Melt the wax
- Soy or beeswax for a natural finish
- Add wick and pour
- Center carefully for even burning
- Let set completely
- Typically 1–2 hours depending on size
- Demold and trim
- Trim wick to ¼ inch
Styling Tips for an Editorial Look ✨
- Group candles in odd numbers
- Stick to soft neutrals (ivory, sand, taupe)
- Mix heights but keep a cohesive tone
- Display on trays, stacks of books, or mantels
Estimated Cost: $
Skill Level: Beginner
Time Needed: 2–3 hours (including cooling)
5.2 Custom Throw Pillow Covers (No-Sew Options)
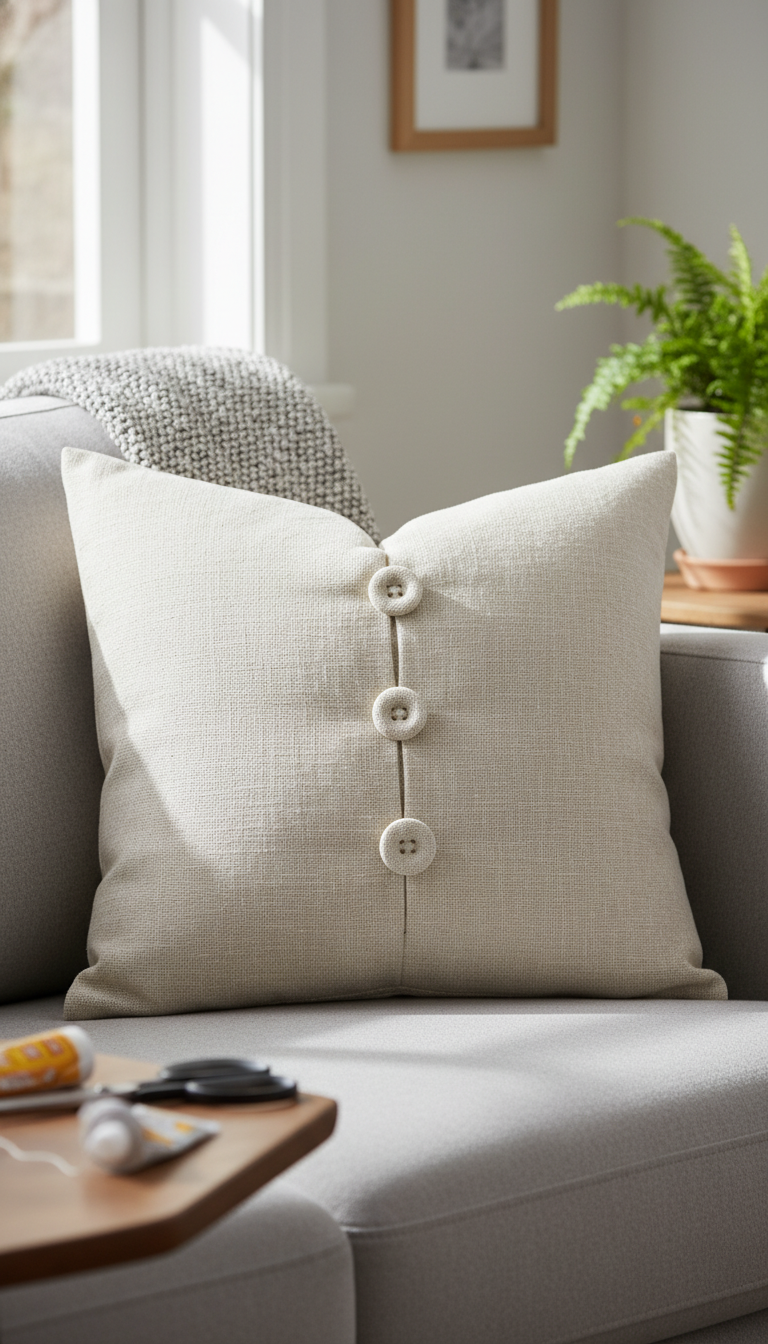
Custom pillow covers are one of the easiest ways to refresh a room’s aesthetic in under an hour, and no-sew methods make this DIY completely beginner-friendly.
Why This DIY Is a Go-To Aesthetic Upgrade
- Instantly updates sofas, beds, and chairs
- Easy to switch out seasonally
- Budget-friendly compared to buying new pillows
- Zero sewing skills required
Best Fabrics for No-Sew Pillow Covers
- Linen or linen-blend fabrics
- Cotton canvas
- Textured neutrals (bouclé, waffle, slub)
- Lightweight upholstery fabric
How to Make a No-Sew Pillow Cover
- Cut fabric to size
- Allow extra fabric for folding
- Wrap around the pillow insert
- Envelope-style fold works best
- Secure closures
- Fabric glue, iron-on hem tape, or decorative buttons
- Adjust corners
- Tuck neatly for a tailored look
- Let adhesives set
- Follow product instructions before use
Styling Tips for a Designer Look
- Use slightly oversized covers for a fuller appearance
- Stick to neutral or earthy tones
- Mix textures rather than colors
- Pair solid pillows with one subtle pattern
Estimated Cost: $
Skill Level: Beginner
Time Needed: 30–60 minutes
5.3 Table Runner or Fabric Overlay DIY
A simple fabric table runner or overlay is a quiet luxury DIY that instantly softens a space and adds texture without overpowering the room.
Why This DIY Is Worth Doing
- Transforms dining tables, consoles, or sideboards
- No sewing required for a natural, relaxed look
- Works beautifully in minimalist, rustic, Japandi, and boho spaces
- Completed in under one hour
Best Fabric Choices
- Washed linen or linen blends
- Cotton muslin or canvas
- Gauze or raw-edge textiles
- Vintage or thrifted fabric pieces
How to Make It in One Day
- Measure your surface
- Decide on overhang length (8–12 inches looks balanced)
- Cut fabric cleanly
- Keep edges slightly imperfect for an organic look
- Finish edges (optional)
- Fray naturally, use iron-on hem tape, or leave raw
- Style intentionally
- Center the runner and smooth lightly
- Layer decor
- Add ceramics, candles, or natural elements
Styling Tips for a Designer Finish ✨
- Let fabric pool slightly for softness
- Keep decor minimal to avoid clutter
- Pair with wood, stone, or ceramic textures
- Stick to one neutral tone for cohesion
Estimated Cost: $
Skill Level: Beginner
Time Needed: 30–45 minutes
6.1 Plug-In Wall Sconces (Rental-Friendly)
https://www.pinterest.com/pin/577797827232193679/
Plug-in wall sconces are one of the most impactful one-day lighting DIYs, instantly adding warmth, depth, and a high-end ambiance without hardwiring. The image strongly reflects current trends toward soft, diffused light and sculptural lamp shades—a favorite across Pinterest and Instagram interiors.
Why This Lighting DIY Is So Effective
- No electrical work required
- Perfect for renters and apartments
- Creates layered lighting instead of harsh overhead light
- Visually elevates bedrooms, living rooms, and hallways
Best Places to Install Plug-In Sconces
- On each side of the bed (nightstand alternative)
- Beside a sofa or reading chair
- In hallways or entryways
- Above consoles or sideboards
How to Install in One Day
- Choose your placement
- Eye-level or slightly above for ambient light
- Mount the fixture
- Use wall anchors or removable wall hooks
- Manage the cord
- Run it neatly using cord covers or fabric-wrapped cords
- Install the bulb
- Warm LED (2700K–3000K) for cozy glow
- Test lighting balance
- Adjust height if needed
Pro Styling Tips ✨
- Opt for fabric or pleated shades for softer light
- Match metal finishes with nearby decor
- Install sconces in pairs for symmetry
- Avoid cool white bulbs—they flatten the mood
Estimated Cost: $$
Skill Level: Beginner
Time Needed: 30–60 minutes
6.2 LED Strip or Puck Light Styling
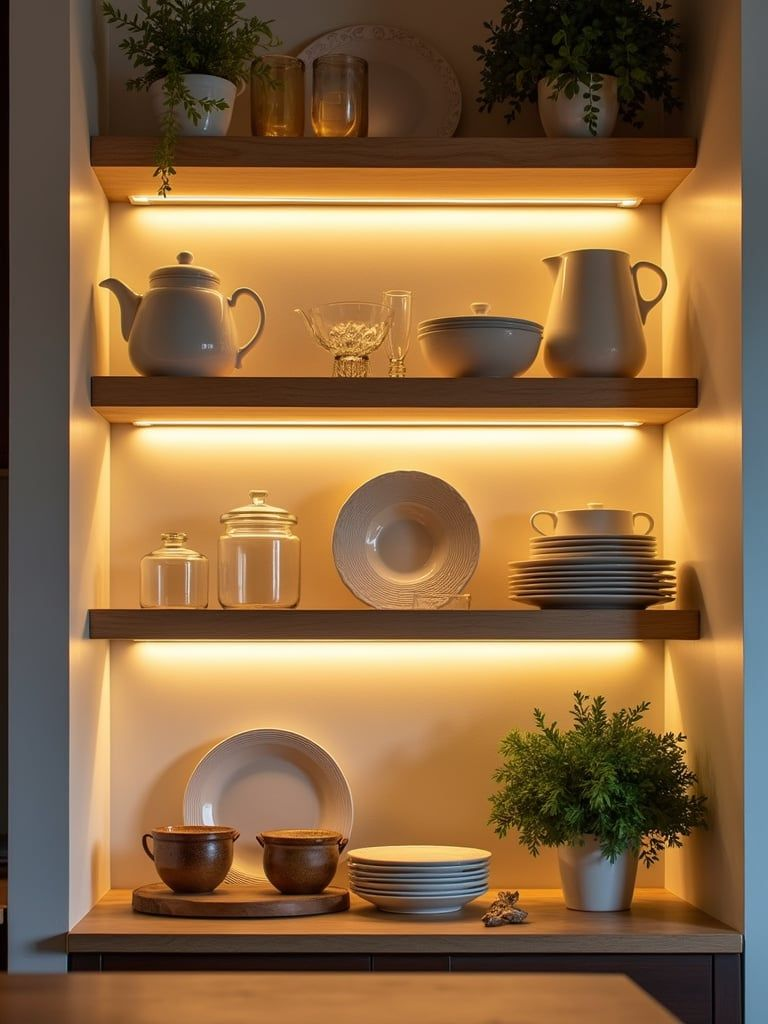
LED strip and puck lights are a secret weapon in aesthetic home DIYs, instantly adding warmth, depth, and a custom-built feel to shelves, cabinets, and nooks. The image perfectly illustrates how soft under-shelf lighting transforms everyday storage into a styled focal point.
Why This DIY Makes Such a Big Difference
- Creates ambient, layered lighting
- Highlights decor without overpowering the space
- Fully renter-friendly and removable
- Can be completed in under one hour
Best Places to Use LED Strip or Puck Lights
- Open shelving
- Kitchen cabinets or pantries
- Bookcases
- Headboards or bed frames
- Closets and display niches
How to Install in One Day
- Choose warm lighting
- 2700K–3000K for a cozy glow
- Clean mounting surfaces
- Adhesive sticks best to dust-free areas
- Install lights discreetly
- Place toward the front underside of shelves
- Hide wires
- Use adhesive clips or tuck behind shelves
- Test brightness
- Adjust dimmer settings if available
Pro Styling Tips
- Avoid cool white LEDs—they look harsh
- Use dimmable options for flexibility
- Space lights evenly for a seamless glow
- Pair with neutral ceramics and natural textures
Estimated Cost: $
Skill Level: Beginner
Time Needed: 30–45 minutes
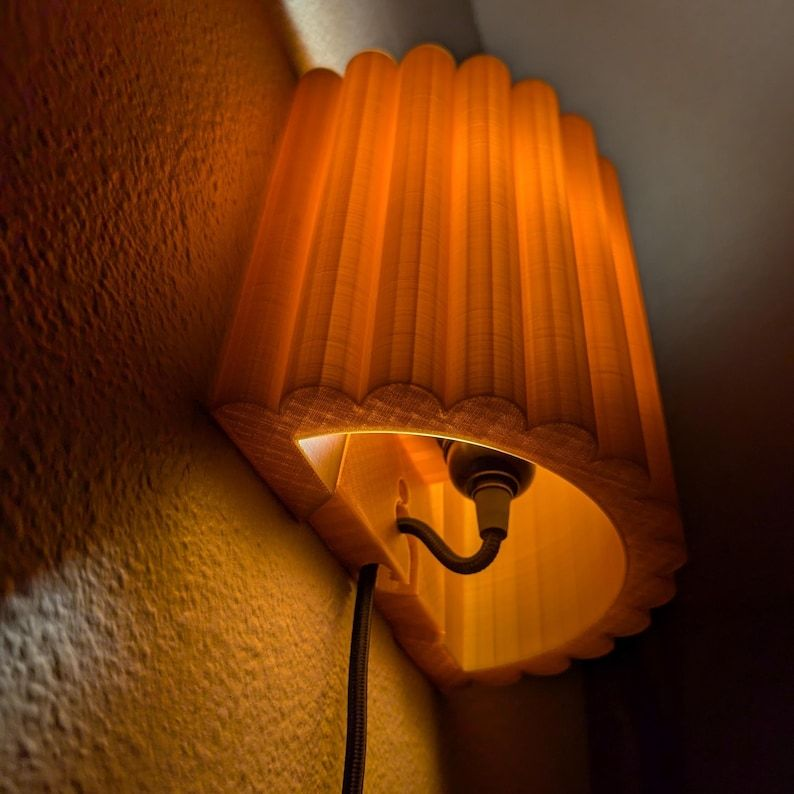
6.3 DIY Lamp Shade Makeover
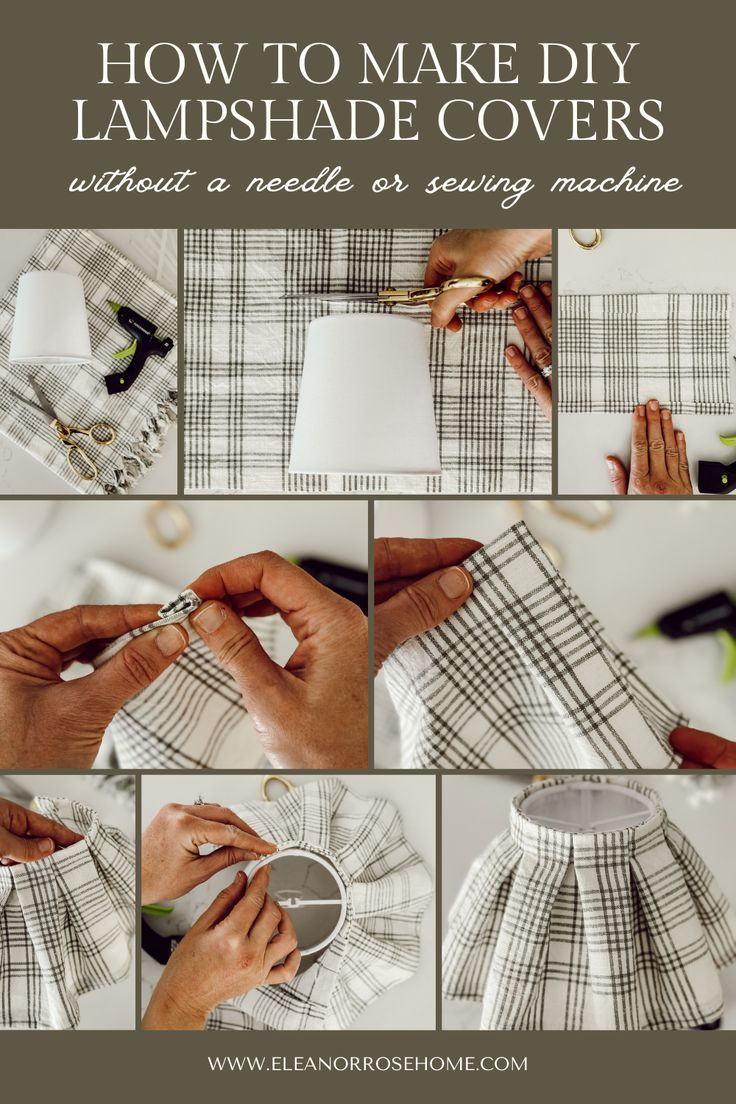
A lamp shade makeover is a high-impact, low-effort DIY that completely changes the mood of a room. The image aligns perfectly with current trends showing fabric-wrapped, pleated, and textured shades—a popular alternative to replacing entire lamps.
Why This DIY Is So Effective
- Instantly softens harsh lighting
- Allows you to customize lamps to your decor
- Much cheaper than buying new designer lamps
- Fully achievable in one afternoon
Popular Lamp Shade Makeover Styles
- Fabric-wrapped neutral shades
- Pleated or gathered fabric covers
- Textured linen or cotton overlays
- Patterned fabric for subtle contrast
How to Do It in One Day
- Choose your fabric
- Lightweight cotton, linen, or blends work best
- Measure the shade
- Allow extra fabric for pleating or overlap
- Attach fabric
- Use fabric glue, hot glue, or clip-on methods
- Smooth and secure
- Work slowly to avoid wrinkles
- Trim excess
- Finish edges cleanly along top and bottom rims
Pro Styling Tips ✨
- Stick to light or neutral fabrics for better light diffusion
- Avoid thick or dark materials that block light
- Match fabric texture with nearby textiles
- Pair with warm bulbs for maximum ambiance
Estimated Cost: $
Skill Level: Beginner
Time Needed: 1–2 hours
7.1 Over-the-Door Storage Aesthetic Hack
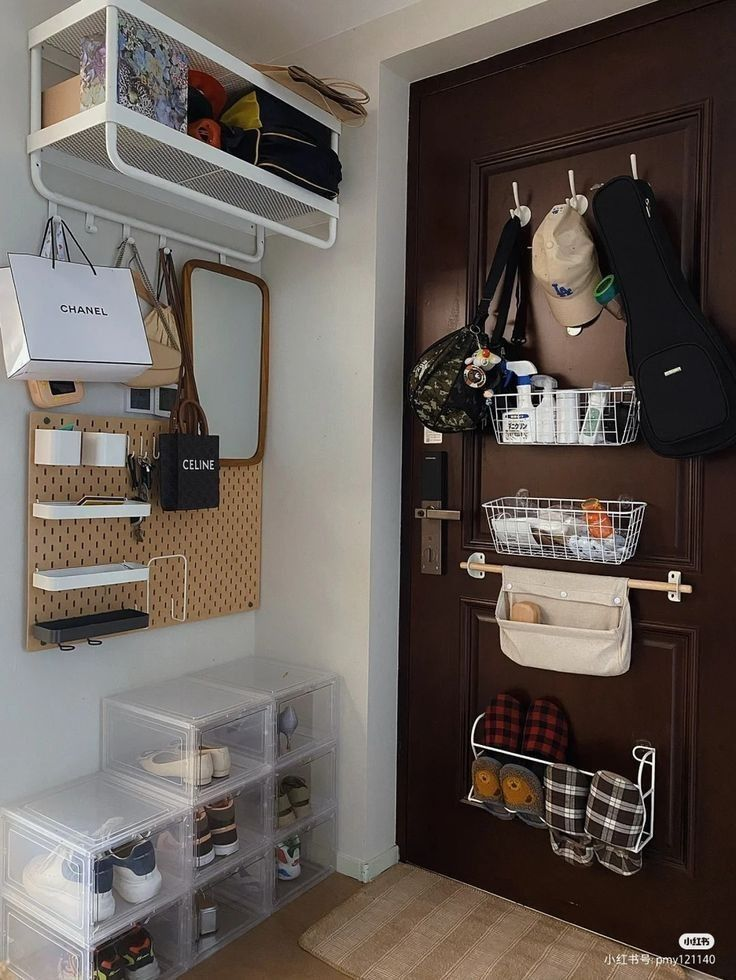
Over-the-door storage doesn’t have to look utilitarian. With a few intentional choices, it can become a functional yet aesthetic solution—especially valuable in apartments and small spaces where every square foot matters. The image clearly shows how layered baskets, hooks, and neutral tones turn a basic door into a mini organization zone.
Why This DIY Is Perfect for Small Spaces
- Uses vertical space that’s often wasted
- Completely renter-friendly (no drilling)
- Keeps essentials visible but organized
- Can be styled to match your decor aesthetic
What Works Best Over the Door
- Wire or fabric hanging baskets
- Minimal hooks for bags, hats, or accessories
- Slim shelves or organizers
- Neutral or coordinated storage bins
How to Style It in One Day
- Choose a cohesive color palette
- White, beige, black, or soft neutrals work best
- Hang the main organizer
- Ensure it sits flat and doesn’t strain hinges
- Group items by category
- Daily-use items at eye level
- Balance function and spacing
- Avoid overfilling baskets
- Edit visually
- Remove anything bulky or visually noisy
Pro Styling Tips ✨
- Mix open baskets + closed pouches for balance
- Stick to repeating materials (wire, canvas, wood)
- Leave negative space—it keeps the setup feeling light
- Use matching hooks for a cohesive look
Estimated Cost: $–$$
Skill Level: Beginner
Time Needed: 30–45 minutes
7.2 Decorative Room Divider or Curtain Panel
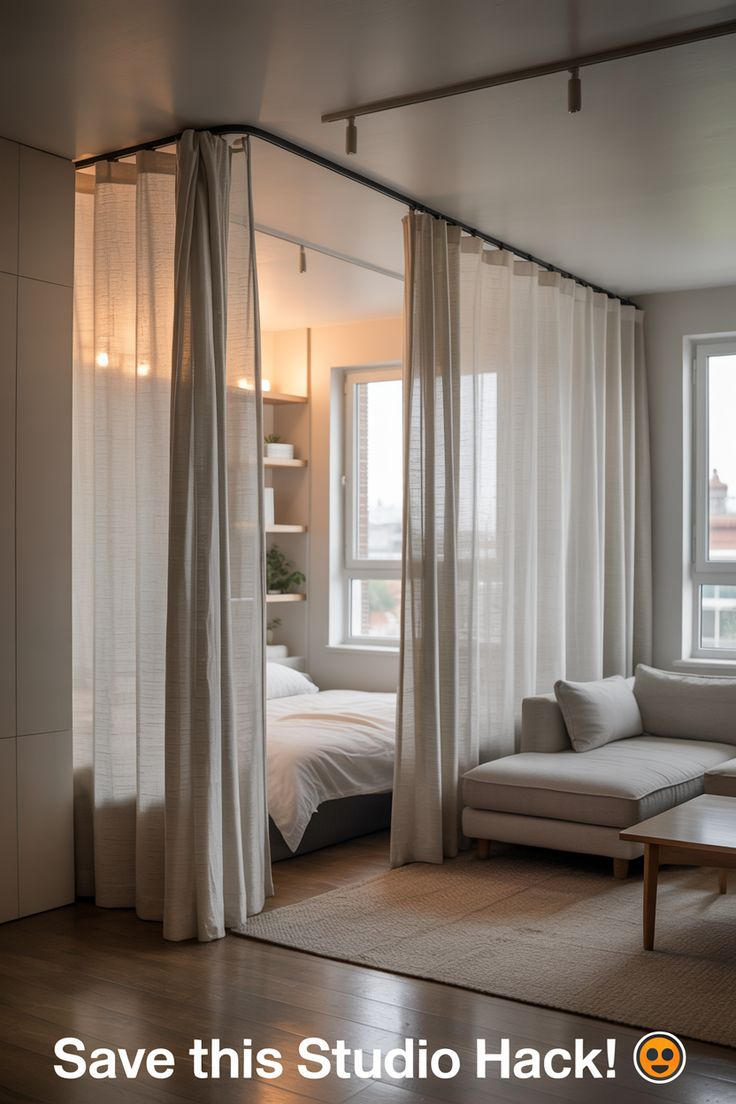
A fabric curtain divider is one of the smartest aesthetic hacks for small apartments and studios. It creates visual separation without blocking light, making spaces feel intentional rather than cramped. The image perfectly reflects current trends toward soft, flowing textiles and ceiling-mounted solutions.
Why This DIY Works So Well
- Instantly defines zones (sleep, work, lounge)
- Maintains an open, airy feel
- Fully renter-friendly and removable
- Completed in under one day
Best Places to Use a Curtain Divider
- Studio apartments (bed vs. living area)
- Home office corners
- Dressing areas or closets
- Reading nooks
How to Do It in One Day
- Choose your curtain fabric
- Sheer or semi-sheer for light flow
- Linen or cotton for softness
- Install the rod or track
- Ceiling-mounted tracks look most seamless
- Tension rods work for quick installs
- Hang and adjust
- Let fabric skim the floor slightly
- Test movement
- Curtains should glide easily
- Style the surrounding area
- Add a rug or lamp to define each zone
Pro Styling Tips ✨
- Stick to neutral tones for versatility
- Use full-length panels to elongate the room
- Avoid heavy patterns in small spaces
- Pair with warm lighting for a cozy effect
Estimated Cost: $–$$
Skill Level: Beginner
Time Needed: 1–2 hours
7.3 Entryway Mini-Makeover (Hooks, Mirror, Tray)
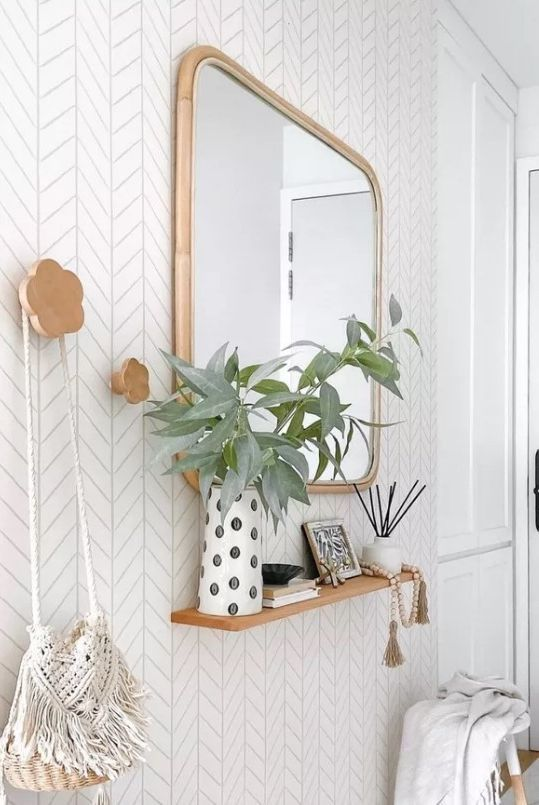
A styled entryway—even a tiny one—sets the tone for the entire home. This mini-makeover focuses on simple, high-impact elements that create both function and visual polish. The image aligns perfectly with current trends favoring light woods, organic shapes, and pared-back styling.
Why This DIY Makes a Big Difference
- Creates a defined drop zone for daily essentials
- Makes small or narrow entryways feel intentional
- Requires minimal tools and time
- Instantly elevates first impressions
Key Elements for a One-Day Entryway Upgrade
- Wall hooks for bags, keys, or hats
- A medium-sized mirror to reflect light
- Slim shelf or tray for small items
- One natural accent (plant, ceramic, or textile)
How to Do It in One Day
- Mount the mirror
- Center it at eye level
- Install hooks
- Space evenly for balance
- Add a shelf or tray
- Keep it narrow to avoid crowding
- Style intentionally
- Limit decor to 2–3 items
- Edit and refine
- Remove anything non-essential
Pro Styling Tips ✨
- Choose rounded or organic shapes to soften walls
- Stick to one metal or wood tone
- Leave negative space—it reads as intentional design
- Add subtle texture (woven bag, ceramic vase)
Estimated Cost: $–$$
Skill Level: Beginner
Time Needed: 45–60 minutes
8.1 DIY Indoor Plant Styling (Pots, Stands, Grouping)

Styling indoor plants is one of the fastest ways to make a home feel calm, elevated, and lived-in. The image perfectly demonstrates a trending DIY technique: creating faux terracotta or plaster-textured pots that look artisanal and high-end without the designer price tag.
Why This DIY Is Everywhere Right Now
- Brings organic texture into modern interiors
- Makes even basic plants look intentional
- Works with real or faux greenery
- Can be completed in one afternoon
Popular Plant Styling Upgrades
- Faux terracotta or plaster-finish pots
- Neutral ceramic or stone-look containers
- Elevated plant stands (wood or metal)
- Clustered plant groupings at different heights
How to Create the Look in One Day
- Start with a basic pot
- Plastic or ceramic works fine
- Create texture
- Use joint compound, plaster, or textured paint
- Apply unevenly
- Dab for an organic, handmade finish
- Let dry fully
- Usually 1–2 hours
- Seal lightly
- Optional matte sealer for durability
Styling Tips for a Natural Look ✨
- Stick to warm neutrals (sand, clay, off-white)
- Group plants in odd numbers
- Vary heights for depth
- Avoid overly glossy finishes
Estimated Cost: $
Skill Level: Beginner
Time Needed: 2–3 hours (including drying)
8.2 Faux Olive / Eucalyptus Arrangement Styling
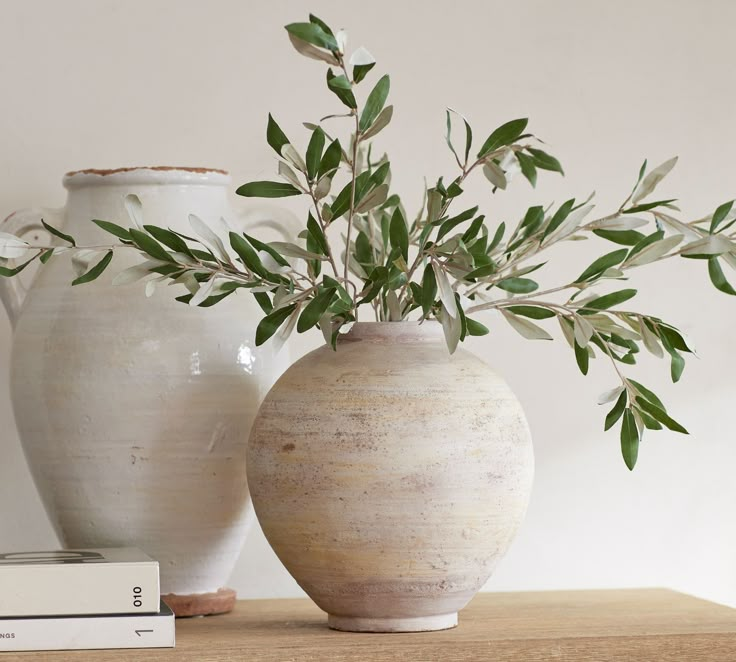
Faux olive and eucalyptus arrangements are a modern classic in aesthetic interiors, especially for anyone who loves greenery without the maintenance. The image perfectly reflects the current preference for soft, airy branches styled loosely in neutral ceramic vessels.
Why This DIY Is So Popular
- Instantly adds life to a space—no watering required
- Works year-round without seasonal swaps
- Ideal for minimalist, Mediterranean, and organic-modern homes
- Can be styled in under 30 minutes
Best Places to Style Faux Greenery
- Dining tables or consoles
- Kitchen counters or islands
- Entryway shelves
- Coffee tables or sideboards
How to Style It in One Day
- Choose realistic stems
- Look for varied leaf tones and flexible branches
- Pick a simple vessel
- Ceramic, stone, or faux-terra-cotta finishes work best
- Trim stems if needed
- Avoid overcrowding the vase
- Arrange asymmetrically
- Let branches drape naturally
- Step back and refine
- Adjust spacing until it feels effortless
Pro Styling Tips ✨
- Use fewer stems than you think you need
- Let some branches extend outward for movement
- Avoid perfectly symmetrical shapes
- Pair with neutral books or trays for balance
Estimated Cost: $–$$
Skill Level: Beginner
Time Needed: 15–30 minutes
9.1 Coffee Table Styling Reset
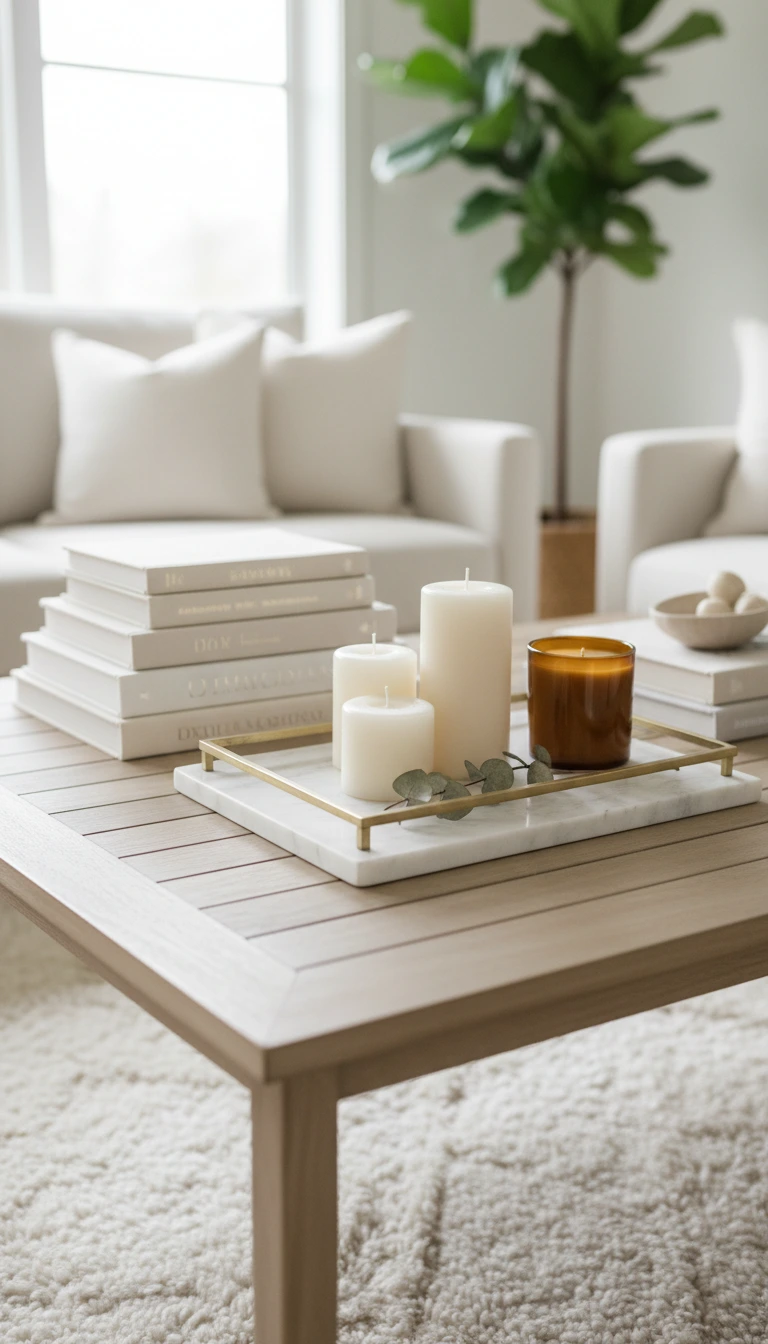
A coffee table styling reset is one of the easiest zero-tool DIYs that instantly makes a living space feel polished and intentional. The image perfectly reflects today’s aesthetic standards: neutral layers, restrained color palettes, and a balance of form and function.
Why This Styling DIY Works So Well
- Takes 10–20 minutes start to finish
- Requires only items you likely already own
- Makes the entire room feel more cohesive
- Easy to refresh seasonally or anytime
Core Elements of a Well-Styled Coffee Table
- A tray to anchor the arrangement
- Stacked books (neutral covers work best)
- Candles or a small sculptural object
- One organic element (plant or branch)
How to Style It (No Tools Needed)
- Clear the surface completely
- Start with a blank slate
- Place a tray
- Centered or slightly off-center
- Add books
- Stack 2–4 books horizontally
- Layer decor
- Candles, bowls, or sculptural objects
- Edit ruthlessly
- Remove anything unnecessary
Pro Styling Tips ✨
- Stick to odd-number groupings
- Vary heights for visual interest
- Leave negative space—don’t overcrowd
- Match tones to surrounding furniture
Estimated Cost: $ (often free)
Skill Level: Beginner
Time Needed: 10–20 minutes
9.2 Open Shelf or Bookcase Re-Edit
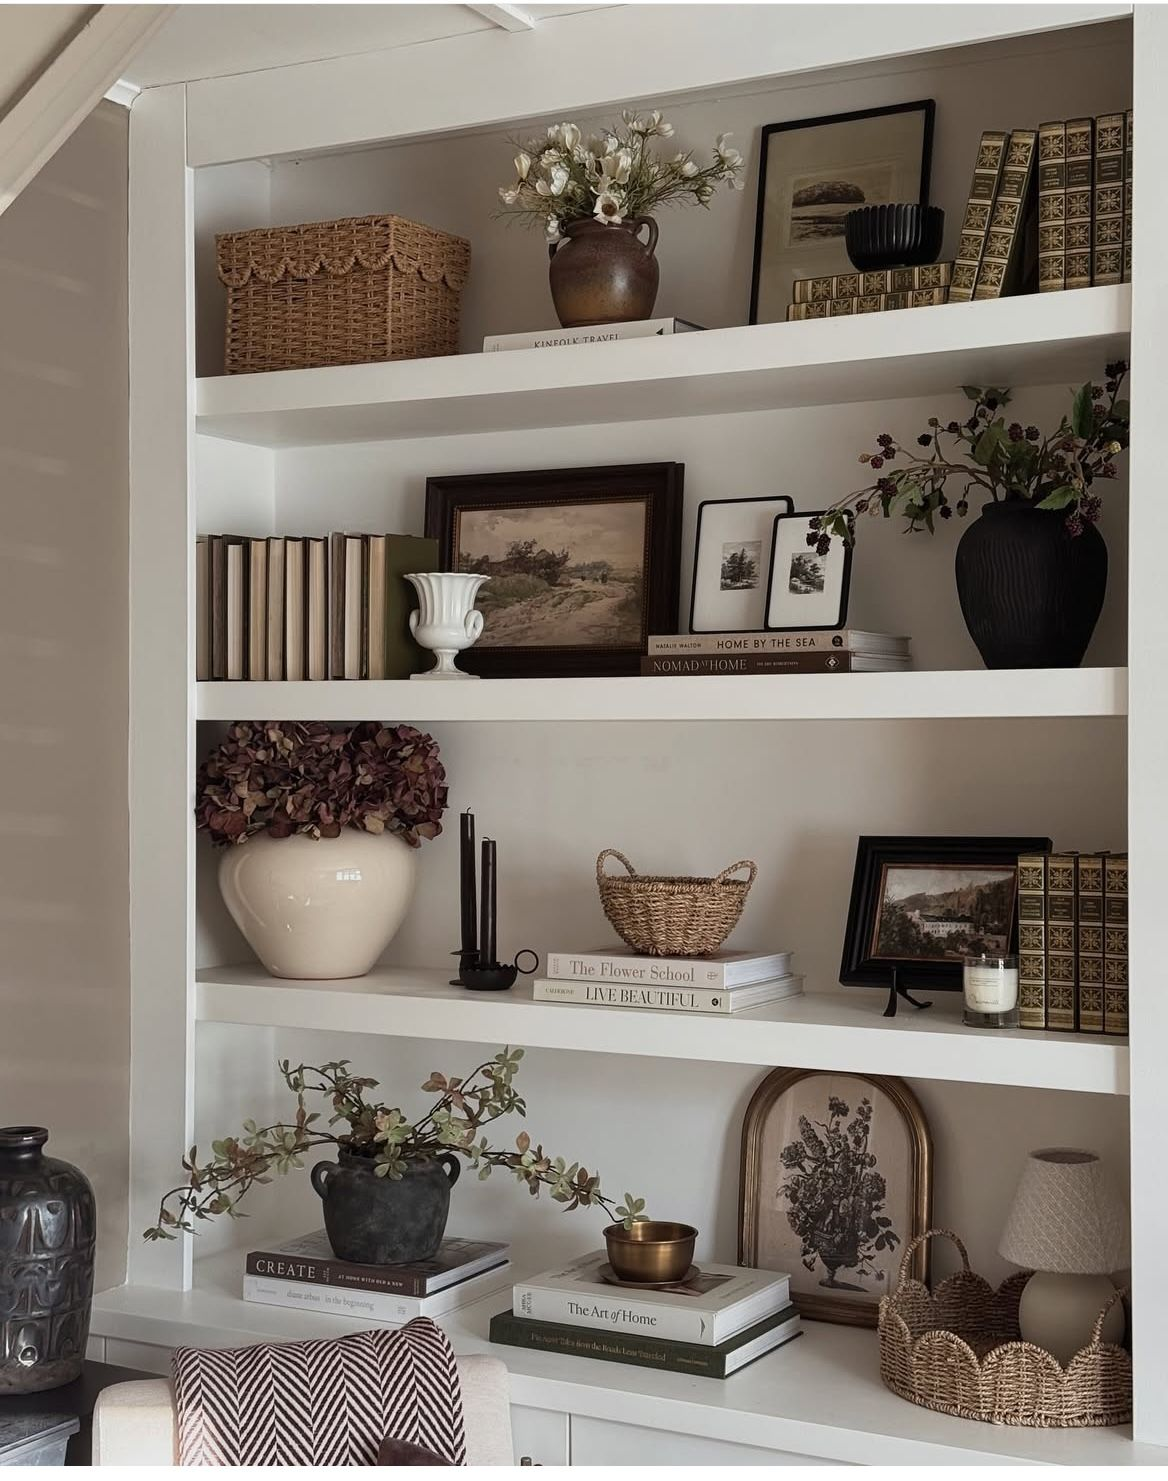
Re-editing open shelves or a bookcase is a pure styling DIY that can completely change how a room feels—without buying anything new. The image perfectly captures the current aesthetic: layered neutrals, curated objects, and intentional spacing.
Why This Styling Reset Is So Effective
- Instantly reduces visual clutter
- Makes collections feel curated rather than crowded
- Highlights favorite pieces you already own
- Takes under one hour
Core Rules for Aesthetic Shelf Styling
- Balance open space with filled areas
- Mix vertical and horizontal orientations
- Repeat materials for cohesion
- Use books as both decor and risers
How to Re-Edit Your Shelves
- Empty everything
- Start with a clean slate
- Group items by type
- Books, baskets, ceramics, frames
- Place large anchor pieces first
- Vases, baskets, framed art
- Layer smaller items
- Candles, bowls, plants
- Step back and adjust
- Edit until it feels calm, not busy
Pro Styling Tips ✨
- Stack books horizontally to vary height
- Use baskets to hide less aesthetic items
- Limit color palette to 2–3 tones
- Leave some shelves partially empty on purpose
Estimated Cost: $ (often free)
Skill Level: Beginner
Time Needed: 30–60 minutes
10. Budget, Time & Tool Reality Check
Before starting any one-day DIY, it’s essential to align expectations with reality. These projects are designed to be achievable, but smart planning is what keeps them stress-free—and actually finished in one day.
💰 Typical Budget Ranges
Most projects in this guide fall into one of these brackets:
- $ (Under $25):
- Styling-only resets
- Candles, fabric runners, pillow covers
- LED lights, hardware swaps (small areas)
- $$ ($25–$75):
- Wall panels (small accent areas)
- Plug-in sconces
- Furniture paint makeovers
- Entryway upgrades
- $$$ ($75–$150):
- Larger furniture refreshes
- Multiple lighting upgrades
- Room dividers or shelving installs
👉 Tip: Visual impact is not tied to cost—many of the most aesthetic results come from the lowest budgets.
⏱️ Realistic Time Breakdown
“One day” doesn’t mean nonstop labor. Most projects break down like this:
- Prep time: 15–45 minutes
- Active DIY work: 1–4 hours
- Drying / setting time: Passive (you can multitask or stop here)
- Styling & cleanup: 20–40 minutes
🧠 Rule of thumb: If active work exceeds 5 hours, it’s no longer a true one-day DIY.
🧰 Common Tools You’ll Actually Need
Most projects reuse the same basic tools:
- Measuring tape
- Level
- Utility knife
- Screwdriver or drill
- Painter’s tape
- Scissors
- Adhesive strips or hooks
- Microfiber cloths
✔ No power tools required for the majority of projects
✔ Most supplies are reusable across multiple DIYs
⚠️ Where DIYs Usually Go Wrong
Avoid these common pitfalls:
- Underestimating prep (dirty surfaces ruin results)
- Ignoring drying time (leads to smudging or peeling)
- Buying too much material instead of measuring first
- Starting too late in the day
- Trying to combine multiple projects at once
✅ How to Guarantee a One-Day Finish
- Choose one focal project, not several
- Prep all materials before starting
- Read instructions fully before step one
- Stop when it looks finished—overworking kills aesthetics
11. Mistakes to Avoid in One-Day DIY Projects
One-day DIYs succeed or fail based on decision-making, not skill level. Most disappointing results come from rushing, overcomplicating, or skipping fundamentals. Avoid these common mistakes to ensure your project looks intentional—not improvised.
❌ Mistake #1: Skipping Prep Work
Prep is not optional—it’s what makes DIYs look professional.
- Dirty walls prevent adhesives from sticking
- Un-sanded furniture causes uneven finishes
- Unmeasured layouts lead to misalignment
✅ Fix: Always clean, measure, and dry-fit before committing.
❌ Mistake #2: Choosing the Wrong Project for Your Time Window
Not all DIYs are created equal.
- Paint-heavy projects need drying time
- Large installations often take longer than expected
- Multi-step projects don’t compress well
✅ Fix: Choose projects with clear stopping points and passive drying time.
❌ Mistake #3: Overbuying or Underbuying Materials
Both slow you down.
- Too little = emergency store runs
- Too much = clutter and wasted money
✅ Fix: Measure twice, buy once—and round up slightly, not excessively.
❌ Mistake #4: Overdecorating at the End
Many people ruin a great DIY during styling.
- Too many accessories
- Competing textures
- No negative space
✅ Fix: Stop styling when it looks finished, not full.
❌ Mistake #5: Ignoring Scale & Proportion
Even beautiful pieces can look wrong if sizing is off.
- Too-small art on large walls
- Tiny rugs in open spaces
- Short curtains that visually shrink ceilings
✅ Fix: When in doubt, size up, especially for wall elements.
❌ Mistake #6: Copying Trends Without Adapting Them
What looks good online may not work in your space.
- Dark trends in low-light rooms
- Busy patterns in small areas
- Statement pieces without balance
✅ Fix: Use trends as inspiration, not strict instructions.
❌ Mistake #7: Forgetting the “Walk-Away Test”
Staring too long causes poor decisions.
- You stop seeing imbalance
- You keep “fixing” what isn’t broken
✅ Fix: Step away for 10 minutes, then reassess with fresh eyes.
12. How to Choose the Right Project for Your Space
Choosing the right one-day DIY is less about skill and more about reading your space correctly. When a project aligns with your room’s layout, light, and function, the result feels effortless—and expensive.
🏠 Start With the Room’s Purpose
Ask one simple question: What should this space do better?
- Living room → feel calmer, more styled
- Bedroom → feel warmer, more restful
- Kitchen → feel brighter, more cohesive
- Entryway → feel organized and welcoming
🎯 Choose a DIY that solves a problem, not just one that looks good online.
💡 Assess Natural Light First
Light determines which projects will succeed.
- Low-light rooms
- Favor mirrors, warm lighting, light colors
- Avoid dark paints or heavy textures
- Bright rooms
- Can handle deeper tones and textured finishes
- Great for wall panels, plant styling, layered decor
📏 Match the Project to Your Room Size
Scale matters more than style.
- Small spaces → styling-only DIYs, lighting, vertical solutions
- Large rooms → statement walls, furniture makeovers, shelving
- Narrow areas → mirrors, ledges, entryway upgrades
🧠 One bold change beats multiple small ones in most rooms.
🏢 Renters vs. Homeowners
Choose accordingly to avoid regret.
Renters should prioritize:
- Peel-and-stick materials
- Plug-in lighting
- Adhesive hooks and shelves
- Fabric-based changes
Homeowners can consider:
- Permanent shelving
- Paint-heavy projects
- Hardware + hinge swaps
- Structural upgrades
🎨 Read Your Existing Aesthetic
Work with what you have.
- Modern → clean lines, neutral palettes
- Cozy / organic → texture, soft fabrics, warm woods
- Minimal → fewer pieces, stronger impact
- Vintage → layered decor, aged finishes
🚫 Avoid mixing too many aesthetics in one DIY.
✅ The Final Decision Checklist
Choose the project that:
- Can be finished in 5 active hours or less
- Requires tools you already own
- Solves a visual or functional issue
- Doesn’t rely on perfect conditions
- Still looks good if you stop early
13. Final Checklist Before Starting Any One-Day DIY
This final checklist is what separates a successful one-day DIY from a half-finished project that lingers for weeks. Review it before you start—once everything is checked off, you’re ready to begin with confidence.
🧾 Supplies Check
Confirm you have everything on hand before starting:
- All materials (with a small buffer)
- Adhesives, fasteners, or finishes
- Replacement parts (hardware, bulbs, hooks)
- Drop cloths or protective coverings
- Cleaning supplies for prep and cleanup
✔ No mid-project store runs = faster completion
🧰 Tools Ready
Lay out tools ahead of time:
- Measuring tape
- Level
- Screwdriver or drill
- Utility knife or scissors
- Painter’s tape
- Microfiber cloths or rags
🧠 If you have to search for tools mid-project, momentum is lost.
🕒 Time & Energy Planning
Be honest about your limits.
- Start earlier than you think
- Allow buffer time for drying or setting
- Avoid starting new sections late in the day
- Plan your stopping point in advance
Rule: If it’s not done by early evening, stop.
🎨 Styling Intent Check
Know your end goal before you begin.
- Choose a clear color palette
- Decide what will be removed, not just added
- Identify one focal point
- Commit to restraint
✨ A finished DIY should feel calm, not crowded.
🧼 Cleanup Strategy
End strong by planning the finish.
- Trash and recycling bags ready
- Wipes or vacuum accessible
- Tools cleaned immediately
- Materials stored or returned
A clean finish makes the project feel complete, not temporary.
✅ Final Go/No-Go Question
Before starting, ask yourself:
“Can I stop at any point today and still like how this looks?”
If the answer is yes, it’s a true one-day DIY.
Conclusion
Aesthetic homes aren’t built overnight—but they are built one intentional decision at a time. The projects in this guide prove that meaningful change doesn’t come from doing everything, but from choosing one upgrade that truly improves how a space looks and feels.
Whether you refreshed lighting, styled surfaces, upgraded textures, or reworked a small corner, what matters most is completion. A finished DIY—even a simple one—creates momentum. It shifts how you experience your home and how confident you feel making future changes.
Use this list as a repeatable system, not a one-time checklist. Come back to it when a room feels flat, when inspiration fades, or when you have a free afternoon and want a win you can actually finish.
One day. One project. Real impact.
Other Articles

14 Guy Room Ideas with a Clean, Modern Style


No Comment! Be the first one.